Hyper-Vで動かしたAmazon Linux 2、ssh接続できるようにしたので作業がまともにできるようになった。
Dockerインストール
Amazon Linux 2なのでdockerのインストールはyumではなくamazon-linux-extrasでインストールする。
Dockerの動作を確認する。
Client:
Debug Mode: false
Server:
Containers: 3
Running: 2
Paused: 0
Stopped: 1
Images: 3
Server Version: 19.03.6-ce
Storage Driver: overlay2
Backing Filesystem: xfs
Supports d_type: true
Native Overlay Diff: true
Logging Driver: json-file
Cgroup Driver: cgroupfs
Plugins:
Volume: local
Network: bridge host ipvlan macvlan null overlay
Log: awslogs fluentd gcplogs gelf journald json-file local logentries splunk syslog
Swarm: inactive
Runtimes: runc
Default Runtime: runc
Init Binary: docker-init
containerd version: ff48f57fc83a8c44cf4ad5d672424a98ba37ded6
runc version: dc9208a3303feef5b3839f4323d9beb36df0a9dd
init version: fec3683
Security Options:
seccomp
Profile: default
Kernel Version: 4.14.198-152.320.amzn2.x86_64
Operating System: Amazon Linux 2
OSType: linux
Architecture: x86_64
CPUs: 1
Total Memory: 3.513GiB
Name: amazonlinux2
ID: YCGL:HXFM:HQ6M:YRGA:7H5L:4E3H:N236:KKGL:HUQI:KCEX:X7MY:MRAZ
Docker Root Dir: /var/lib/docker
Debug Mode: false
Registry: https://index.docker.io/v1/
Labels:
Experimental: false
Insecure Registries:
127.0.0.0/8
Live Restore Enabled: false
WindowsのVS Codeをエディタとして使用する
公開鍵認証の準備
作成コマンドはssh-keygenである。
今回はWSL上のAmazon Linux 2で作成した。実行結果はこちら。

scpコマンドでHyper-V側にid_rsa.pubキーファイルを送り込む。
The authenticity of host '192.168.28.9 (192.168.28.9)' can't be established.
ECDSA key fingerprint is SHA256:siXSa/udJ7vAj8D4ZeZQP5M+Gppvwr2GgKqxkt5HdsI.
ECDSA key fingerprint is MD5:71:e9:ff:9e:43:af:79:9d:a9:44:e1:dd:a6:4c:01:7c.
Are you sure you want to continue connecting (yes/no)? yes
Warning: Permanently added '192.168.28.9' (ECDSA) to the list of known hosts.
ec2-user@192.168.28.9's password:
id_rsa.pub 100% 394 184.6KB/s 00:00
[root@EAGLEII key]#
一方のHyper-V側。上記のscpコマンドで送り込まれたid_rsa.pubキーファイルがある。
合計 44
0 drwx------ 8 ec2-user ec2-user 212 10月 24 04:23 .
0 drwxr-xr-x 3 root root 22 10月 22 10:01 ..
8 -rw------- 1 ec2-user ec2-user 4625 10月 24 04:35 .bash_history
4 -rw-r--r-- 1 ec2-user ec2-user 18 1月 16 2020 .bash_logout
4 -rw-r--r-- 1 ec2-user ec2-user 193 1月 16 2020 .bash_profile
4 -rw-r--r-- 1 ec2-user ec2-user 450 10月 24 04:08 .bashrc
0 drwx------ 3 ec2-user root 25 10月 23 12:44 .cache
0 drwx------ 3 ec2-user ec2-user 25 10月 23 15:17 .config
0 drwxrwxr-x 4 ec2-user ec2-user 106 10月 23 15:19 .npm
4 drwxrwxr-x 8 ec2-user ec2-user 4096 10月 24 04:06 .nvm
0 drwx------ 2 ec2-user ec2-user 48 10月 23 13:44 .ssh
16 -rw------- 1 ec2-user ec2-user 14172 10月 24 04:08 .viminfo
0 drwxrwxr-x 7 ec2-user ec2-user 231 10月 23 14:44 EhimeNetLiteracyDocker
4 -rwxrwxr-x 1 ec2-user ec2-user 394 10月 24 04:23 id_rsa.pub
[ec2-user@amazonlinux2 ~]$
これを.sshのauthorized_keysに上書きする。
[ec2-user@amazonlinux2 .ssh]$ ls -las
合計 8
0 drwx------ 2 ec2-user ec2-user 48 10月 23 13:44 .
0 drwx------ 8 ec2-user ec2-user 212 10月 24 04:23 ..
4 -rw------- 1 ec2-user ec2-user 394 10月 24 04:24 authorized_keys
4 -rw-r--r-- 1 ec2-user ec2-user 171 10月 23 13:44 known_hosts
[ec2-user@amazonlinux2 .ssh]$
接続確認をする。WSLで作成したキーだけど、PowerShellからssh接続する。 問題ない。もちろんWSLからも成功した。

VS Codeでssh接続
Visual Studio Codeでssh接続するときは左下の><アイコンをクリックする。

これが出ない場合やこのあとsshのメニューが出ない場合は、Microsoftのssh関係拡張機能の青アイコンの3つをインストールする。一個目が接続用で必須、2個目はConfigの編集、3個目はExplorer機能。緑のアイコンの拡張機能をインストールするとコンフリクトするみたいで「消せ」って出るのでインストールしない。

メニューが出た。

細かくて見辛いので切り取ってスクショ。上から同一ウィンドウで接続、別ウィンドウで接続、Configの編集、開始方法の順(ブラウザに飛ぶ)。

1番目か2番目を選ぶ。
まだ設定を入れていないので、[+ Add New SSH Host…]を選び上のPowerShellで使用したsshコマンドをコピペ。

こうなって、

こうなる。もちろん今回はLinuxを選択

これで接続できるがIPアドレスだとカッコ悪いのでConfigを開き、名前を編集。Port番号を変えている時なども設定可能。IdentifyFileは相対パスで書かれているが、絶対パスに変更した方がいいだろう。

今回はうまくいかなかったので、以前設定したときのものを調べてみた。
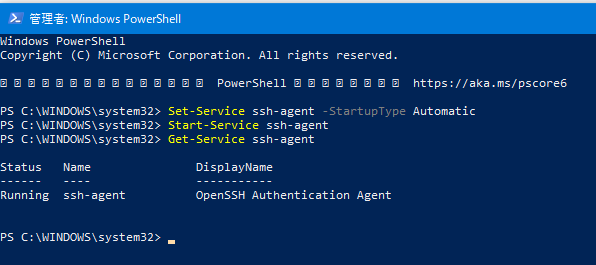
該当部分を読むと管理者モードPowerShellを起動し、下記のコマンドを入れろとある。
To enable SSH Agent automatically on Windows, start PowerShell as an Administrator and run the following commands:
# Make sure you're running as an Administrator
Set-Service ssh-agent -StartupType Automatic
Start-Service ssh-agent
Get-Service ssh-agent
Now the agent will be started automatically on login.
実行してみる。

ファイアウォールのポップアップが出た。[アクセスを許可する(A)]をクリックする。

なんかメッセージが出た。

接続でき、

設定した名称も問題ない。これでVS Codeで編集可能。編集するときはVS Code側からファイルを探したり新規作成したりする。WSLみたいにCodeコマンドで動かないのは不便だが。

今回はこんなところで。

