前々回はPython環境について全体的な説明、前回は実際にインストールをやってみた。今回はJupyter Notebookを入れる。
shigeo-t.hatenablog.com
shigeo-t.hatenablog.com
Jupyter Notebook
Python等のコードをCellという単位で分割して実行可能なWebシステム。前回までで作成したpyenv+pipenv実行環境上にインストールして利用可能にする。
インストール手順参考
qiita.com
Webシステムなので必要に応じて仮想化ソフトウェア側でJupyter Notebookのポートをフォワードしておくと利用しやすくなる。
インストールしてみる
pipenv確認
参考手順ではpipenvをインストールしろって書いてあるが、前回作った環境にはすでに入っている。一応確認。
shigeo@ubuntu:~$ cd sample/
shigeo@ubuntu:~/sample$ ls
py39
shigeo@ubuntu:~/sample$ cd py39/
shigeo@ubuntu:~/sample/py39$ ls -las
合計 16
4 drwxr-xr-x 3 shigeo shigeo 4096 May  6 11:20 .
4 drwxr-xr-x 3 shigeo shigeo 4096 May  6 11:16 ..
4 -rw-r--r-- 1 shigeo shigeo    6 May  6 11:16 .python-version
4 drwxr-xr-x 3 shigeo shigeo 4096 May  6 11:21 pipenvdemo
shigeo@ubuntu:~/sample/py39$ python  --version
Python 3.9.5
shigeo@ubuntu:~/sample/py39$ pipenv --version
pipenv, version 2020.11.15
問題ない。
プロジェクト作成
プロジェクト用のディレクトリを作成し、pipenvコマンドでJupyter NotebookとJupytextをインストールする。
shigeo@ubuntu:~/sample/py39$ mkdir jupyter
shigeo@ubuntu:~/sample/py39$ cd jupyter/
shigeo@ubuntu:~/sample/py39/jupyter$ pipenv install jupyter jupytext
Creating a virtualenv for this project...
Pipfile: /home/shigeo/sample/py39/jupyter/Pipfile
Using /home/shigeo/.pyenv/versions/3.9.5/bin/python3.9 (3.9.5) to create virtualenv...
⠴ Creating virtual environment...created virtual environment CPython3.9.5.final.0-64 in 903ms
  creator CPython3Posix(dest=/home/shigeo/.local/share/virtualenvs/jupyter-rFSXgfw1, clear=False, no_vcs_ignore=False, global=False)
  seeder FromAppData(download=False, pip=bundle, setuptools=bundle, wheel=bundle, via=copy, app_data_dir=/home/shigeo/.local/share/virtualenv)
    added seed packages: pip==21.1.1, setuptools==56.0.0, wheel==0.36.2
  activators BashActivator,CShellActivator,FishActivator,PowerShellActivator,PythonActivator,XonshActivator

✔ Successfully created virtual environment!
Virtualenv location: /home/shigeo/.local/share/virtualenvs/jupyter-rFSXgfw1
Creating a Pipfile for this project...
Installing jupyter...
Adding jupyter to Pipfile's [packages]...
✔ Installation Succeeded
Installing jupytext...
Adding jupytext to Pipfile's [packages]...
✔ Installation Succeeded
Pipfile.lock not found, creating...
Locking [dev-packages] dependencies...
Locking [packages] dependencies...
Building requirements...
Resolving dependencies...
✔ Success!
Updated Pipfile.lock (0b38b2)!
Installing dependencies from Pipfile.lock (0b38b2)...
  🐍   ▉▉▉▉▉▉▉▉▉▉▉▉▉▉▉▉▉▉▉▉▉▉▉▉▉▉▉▉▉▉▉▉ 0/0 — 00:00:00
To activate this project's virtualenv, run pipenv shell.
Alternatively, run a command inside the virtualenv with pipenv run.
初回のみ行う手順
- カレントディレクトリをプロジェクト用のディレクトリに移動します。
- pipenv run jupyter notebook --generate-configコマンドを実行し、~/.jupyter/jupyter_notebook_config.pyを作成します。
- echo 'c.NotebookApp.contents_manager_class = "jupytext.TextFileContentsManager"' >> ~/.jupyter/jupyter_notebook_config.pyコマンドを実行し、Jupytextを利用可能にします。
- echo 'c.ContentsManager.default_jupytext_formats = "ipynb,py"' >> ~/.jupyter/jupyter_notebook_config.pyコマンドを実行し、Jupyter NotebookとPythonスクリプトが連動するように設定します。
ということなので、順にやっていく。
shigeo@ubuntu:~/sample/py39/jupyter$ pipenv run jupyter notebook --generate-config
Writing default config to: /home/shigeo/.jupyter/jupyter_notebook_config.py
shigeo@ubuntu:~/sample/py39/jupyter$
shigeo@ubuntu:~/sample/py39/jupyter$ echo 'c.NotebookApp.contents_manager_class = "jupytext.TextFileContentsManager"' >> ~/.jupyter/jupyter_notebook_config.py
shigeo@ubuntu:~/sample/py39/jupyter$
shigeo@ubuntu:~/sample/py39/jupyter$ echo 'c.ContentsManager.default_jupytext_formats = "ipynb,py"' >> ~/.jupyter/jupyter_notebook_config.py
Jupyter Notebookを使ってみる
起動
pipenv run jupyter notebookで起動しろということなので、起動してみる。
shigeo@ubuntu:~/sample/py39/jupyter$ pipenv run jupyter notebook
[I 17:15:42.095 NotebookApp] ノートブックサーバは cookie secret を /home/shigeo/.local/share/jupyter/runtime/notebook_cookie_secret に書き込みます
[I 17:15:42.502 NotebookApp] [Jupytext Server Extension] NotebookApp.contents_manager_class is (a subclass of) jupytext.TextFileContentsManager already - OK
[I 17:15:42.506 NotebookApp] ローカルディレクトリからノートブックをサーブ: /home/shigeo/sample/py39/jupyter
[I 17:15:42.506 NotebookApp] Jupyter Notebook 6.3.0 is running at:
[I 17:15:42.506 NotebookApp] http://localhost:8888/?token=073649df1c42e656ac35d0c9791b3c91184eebd838336cab
[I 17:15:42.506 NotebookApp]  or http://127.0.0.1:8888/?token=073649df1c42e656ac35d0c9791b3c91184eebd838336cab
[I 17:15:42.506 NotebookApp] サーバを停止し全てのカーネルをシャットダウンするには Control-C を使って下さい(確認をスキップするには2回)。
[C 17:15:42.628 NotebookApp]

    To access the notebook, open this file in a browser:
        file:///home/shigeo/.local/share/jupyter/runtime/nbserver-13391-open.html
    Or copy and paste one of these URLs:
        http://localhost:8888/?token=073649df1c42e656ac35d0c9791b3c91184eebd838336cab
     or http://127.0.0.1:8888/?token=073649df1c42e656ac35d0c9791b3c91184eebd838336cab
[I 17:16:17.003 NotebookApp] 302 GET /tree (127.0.0.1) 1.570000ms
[W 17:16:27.026 NotebookApp] 401 POST /login?next=%2Ftree (127.0.0.1) 2.040000ms referer=http://localhost:8888/login?next=%2Ftree
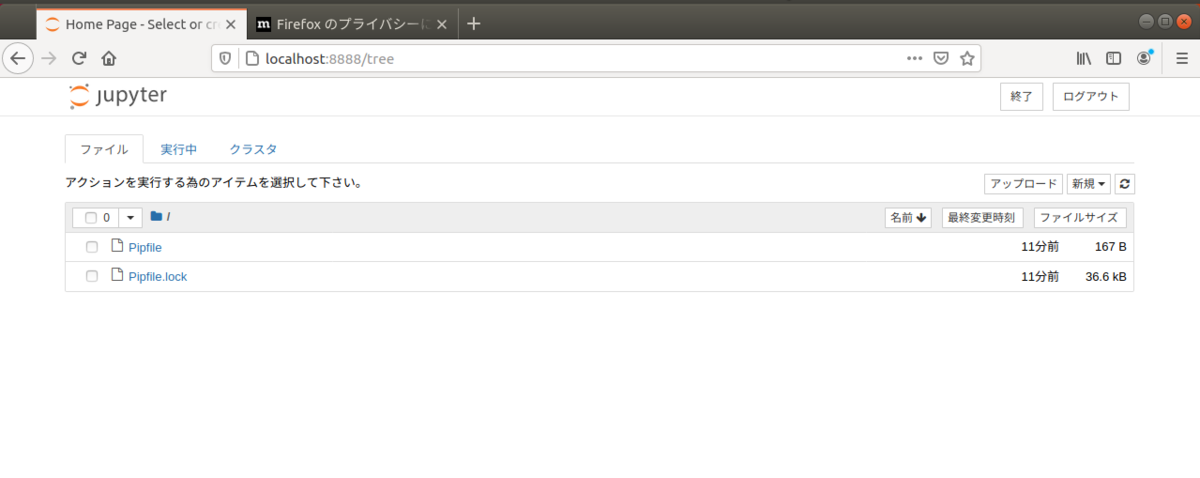
ブラウザでJupyter Notebookが開いた。
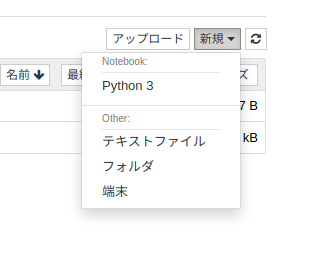
作成
新規をクリックするとPython3がメニューにある。
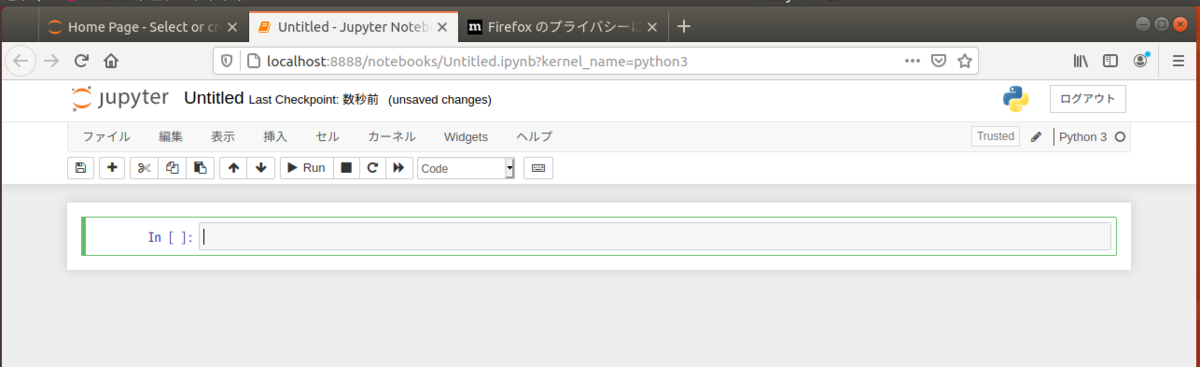
Python3を選んでみる。新規タブにこのように表示される。
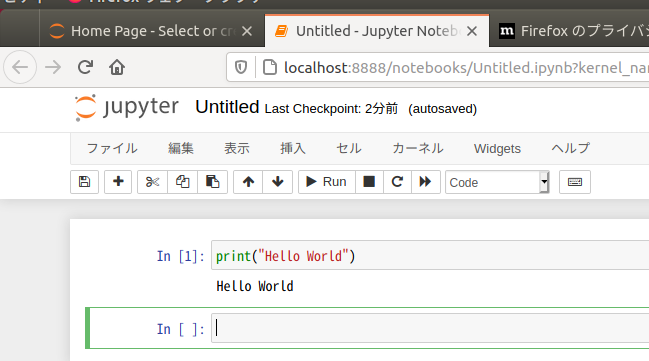
お約束でHello Worldしてみた。
今回はここまで。Jupyter Notebookを便利に使う方法は別途調べてある。
![改訂版 Pythonユーザのための Jupyter[実践]入門](https://m.media-amazon.com/images/I/51gXCVsVQiL._SL500_.jpg "改訂版 Pythonユーザのための Jupyter[実践]入門")
